LilyBean & Baxter


Here recently I was introduced to a fun new company called LilyBean & Baxter. 
I was amazed at all the fun personalized items I saw when browsing their site. I was very excited when I was asked to do a review for them.

Anna sent me this pretty tote to review.


I love the beautiful gray damask pattern on it!
If your like me,  you can never have enough totes! They are perfect for organizing!


It also has plenty of space inside! It has a zipper closure and handles long enough so that you can just put it over your shoulder!

The one thing that stood out to me about LilyBean & Baxter was the personalization available on their products. Here are a few of my favorite items from their site...

LOVE the Pillow Case!

Personalized Cutting Board

Uptown Necklace Set

Want to learn more about LilyBean & Baxter?
Check out their website at the link below


Premier Jewelry


I absolutely LOVE jewelry so I was super excited to have the opportunity to help out Abby Lowery with Premier Designs with a product review!
She sent us some of her favorite items to review!

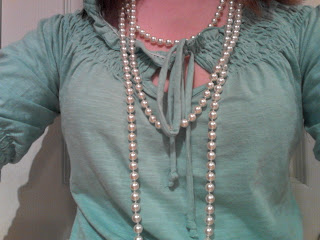
She sent us this beautiful pearl necklace to review along with a gorgeous gold flower clip!


I absolutely love pearls! I love how they are the perfect accessory for practically any outfit!
They are like that perfect staple item that every girl must have!


The flower clip can attach to the necklace in a few different ways! The clip has a pin on the back so it can be added to any jacket, etc. You can also clip it on your necklace to add a pop!


The awesome part about this necklace is it can be worn in so many different ways! 

Premier Jewelry has lots of beautiful pieces to choose from!
Here are just a few of my favorites!


Be sure to check out more Premier Jewelry with Abby Lowery on Facebook or on their Website


7-Wonders Design Studio


7-Wonders Design Studio creates beautiful typography art to decorate your home.
They have fun pieces to match any decor! Wether you like lots of color or you have a specific one in mind, they've got exactly what you want!

7-Wonders Design Studio sent us this fun and colorful kids bathroom wall art set.


I LOVE the fun colors as well as the fun phrases and photos on each one!
They looked perfect in my guest bathroom!


They have some really fantastic pieces that I would LOVE to have in my home!


7-Wonders Design Studio offers prints for family, nursery, wedding, kitchens and more!
They also come in a variety of sizes!

You can check out more of their beautiful art by checking them out on Facebook & Etsy


Citrus Lane


As I stumbled across Citrus Lane just a few weeks ago, I instantly fell in love! 
I don't have children myself, but I loved the idea of what they offer!
When you sign up to join Citrus Lane, you'll receive a box of goodies each month for your little one!
Each box is custom created based on your child's age. 


There are 3 different package subscriptions that you can choose from. 
A monthly subscription at $25 a month, 3 months at $25 and the best deal- 6 months at just $21 a month.

Your monthly subscription also includes FREE Shipping!

So what exactly is in these boxes?
All products that you'll find inside your box are mom approved and personalized to your child's age and stage. 

Our lovely blogger Bridget and her little girl Maci reviewed the box that we received. 

My name is Bridget and I have a 1 year old daughter. 


I recently had the opportunity to review a gift set from Citrus Lane. In my set I received a set of snack bowls which are very durable and eco friendly because they are made from recycled milk cartons. I received a bottle of moisterizer that is certified organic and smells very good. It also works great on my daughters dry winter skin, and its even gentle enough to put on her sensitive face. 

Another thing I received was a food container which is great for carrying snacks. It has two compartments so that you can have two different snacks without them mixing. It is BPA free and lead safe. It is also top rack dishwasher safe!  I received a wooden whale clapper toy that my little musician LOVES to click together. Its great for developing fine motor skills and music skills. Lastly, I received a package of apple cinnamon oatmeal from Plum Organics Baby. It is VERY handy because it is in a pack that is ready to serve, but you can also serve it heated if you like. My little darling loves oatmeal and this had a softer texture than regular oatmeal and she seemed to love that! If you sign up for Citrus 
Lane packages,you can guarantee you will receive some of the best gifts for your little tot!

You will not be disappointed with Citrus lane! 
Its a wonderful opportunity to try out some of these fun, safe & health products for your little one!
To sign up for your subscription and save $10, Please Visit Citrus Lane by clicking the link below or the Citrus Lane Banner to the right of this post!

Are You a Winner?


A big thank you to everyone who entered in our giveaways and to those vendors who participated!

Congrats to our winners!

NOELSbyNATALIE
Laura Gabriele-Enriquez

Premier Jewelry
Maria Powell

HC Boutique
Faith Markuson

Radiantly You
Susan Martin

Origami Owl
Heather King

You should be receiving an email from the sponsor if you are a winner! If you do not respond to them within 48 hours a new winner will be drawn! 


Authentic Common Scents


I dont know about you but I am a candle fanatic! 
Its nothing like the yummy aromas wafting through your house! I love the cozy feeling it creates.
I was very excited to be doing a review for Authentic Common Scents.

They asked me to choose one of there scents to review. They had some very fun and unique scents so It was pretty hard to choose! I finally decided on Kettle Corn. Interesting right?
The moment I pulled that package out of the mailbox I knew what it was! I could smell it through the box!


From the moment I first lit this candle- I was in LOVE! 
All you can smell is the yummy buttery scent drifting through the house. It just makes me wanna go pop a bag of popcorn right now! 

You will continue to smell this scent throughout your use of this candle. 
It also burns really nicely! 
Those are the two things I look at when burning a candle. Good candles keep a scent and don't burn out too quickly.


Authentic Common Scents is more than just candles!
They also carry soap, body butter, face masks, moisturizers and lip balms!

Be sure to check them out on Etsy and on Facebook :)

Facebook
Etsy

Conversation Pieces


Conversation Pieces is a boutique based in Los Angeles, California. 
Whether your looking for fun accessories or a new stylish outfit, they've got exactly what your looking for. Just one glance at their website and you'll be in love!

Conversation Pieces sent us two fun accessories to review.
One thing that always stands out is the packaging when I receive a product. 
When you receive an order from Conversation Pieces, you can guarantee it'll be wrapped nicely in colored paper and tied with a beautiful lace ribbon with a a yummy sucker tucked inside!


Packed snuggly inside were two adorable and stylish accessories that I couldn't wait to get my hands on!

The first item I couldn't wait to try on what the fun and colorful "Happy Tunes Scarf"


The fun thing about this scarf is how its made. Its one piece so you can easily layer it to where it however you'd like!


I looped mine around my head twice. With all the great colors in the scarf, it goes with pretty much everything! It paired nicely with a white long sleeved tee.
This beautiful scarf is available for just $12!

They also sent me this adorable "Queen of Hearts" bracelet in Blush.


I love this bracelet for numerous reasons. 
I have a very small wrist so I was ecstatic to find out it was a stretch bracelet!
It fits my wrist perfectly and doesn't slide all over my arm.
I also really really like the color of it! The color is almost a pinkish- nude color which gold around the outside of the hearts. It looks so good with my skin tone!

The stretchy band on this bracelet fits wrist sizes 6"-8"
Its also available in Black and in White.

Choosing a favorite item from their website would be next to impossible. 
They have so many fun and beautiful products!


Website:

Facebook:


DIY Glitter Cork Board


Recently I have seen the beginnings of a new fad. I have seen striped glittery canvases everywhere! I really like them, I think they are cute, bold, and super girly. I wanted to make one, but like everything else, I like for it to have more than one function. My solution? A glitter cork board! I already used mine to hang my jewelry on, but I thought this would be the perfect upgrade.
Whats the stuff?
-Glitter glitter glitter
-Framed Cork board
-Paint
-Glue, regular and spray glue
-Thin paper (computer paper works great)
-A ruler for straight lines
-Pen and marker


Step one:
Draw your stripes. Simple as that! Use a marker/sharpie to make them extra dark so that you can see them through your paper.


Step two:
Glue paper on board. Glue only the corners to avoid wrinkly paper.
Trace lines through paper.


Step three:
Paint & Glitter!
I left a white stripe in the middle for a ribbon so that I could hang my earrings on it (:


There you go! I guarantee that you will have glitter everywhere and that your house will look like fairy land, but it is all for the cause, right?
Enjoy!
-Emily

Having Faith


"Have Faith" seems like one of those things you hear others say a little too often.
Saying it is one thing, but doing it- definitely another.

Sometimes when life's got me down, I try and try to just be patient and have faith but I find myself being impatient. Ever feel like you just need a sign from above?

Its kind of amazing how God can send you your "sign" through the oddest ways.
The other day at work I was working some transactions that came thru the mail.
I open an envelope and inside was a bookmark with the following on it:


Sometimes a little assurance makes a big difference.
It reminds me that he's in charge.


NOELSbyNATALIE


I am in LOVE with NOELSbyNATALIE! They are always my #1 go to place for my holiday decor!
I've reviewed several items as well as purchased some and I've never been let down!
I love how many of her decorations have a primitive look to it :) It fits my home perfectly!

I reviewed 2 gorgeous items this week that were a perfect addition to my Valentines Decor!


I love this adorable felt heart garland! It fits my decor perfectly :)
The hearts are made of different colors and are sewn together.

I also reviewed this beautiful heart wreath with berries


I love how adorable this is! 

Its hard to pick out my favorites from her page because I just love it all!
Check out her beautiful Yarn Wreaths! LOVE


Love the bowl fillers! I have a set of my own ragball fillers and I LOVE them :)


Be sure to visit NOELSbyNATALIE online!


DIY Ruffly Apron


A few months ago, I found an adorable apron on Pinterest. It was a typical type of apron, but it had ruffles..and that makes a huge difference. After staring at the picture for a while, I decided to make my own, without a pattern (I like to do things like that way sometimes, it's like a small adventure). My apron turned out good, surprisingly! Since then, I have made several different aprons using the same technique, but they are all so different. The number of ruffles can vary, the pattern and print of the fabrics can change the look of one dramatically, I even changed fabrics in the apron that I will use as an example. But, as always, be creative, daring, and spontaneous with your own...it turns out to be much more fun that way!


So here's the stuff:
-At least 2 yards of fabric, any fabric...really, any. (unless, of course, you want to wash your apron over and over again, then you may want to stick to washable fabrics)
-Thread to match your fabric, or not. It's your choice.
-A measuring tape used to...well...measure. Unless you think you are awesome and don't need one.
-A sewing machine is nice to use also.


Step One:
Choose the order that you want to use your fabrics. You need one as the base of your apron, one or more to use for ruffles, and then one to use for ties and straps. A solid or more neutral color looks nice as a base with more detailed fabrics for the ruffles.

Step Two:
Measure your base fabric. To do this you will need to decide how long you want your apron to be. Measure on yourself so that you will have an accurate measurement and add two inches to that number*.

*You will need that extra fabric so that when you sew the hem you will not lose your length.

Measure around your hips (not waist) for the width and add two inches again. Now subtract 10 inches so that you will not have an apron that will wrap around your entire body...unless you somehow manage to get THAT messy when you cook and need it(:


Next measure your bust. No, not all the way around, but you will want your apron to fit you all the way across across your chest.


Measure exactly how wide you want that portion of your apron. This time you will add 4 inches.

Finally, measure how long you will want your top section to be. This will be the length between the top of your apron and your first ruffle and waist ties. This time add one inch.


Step Three:
Time to start cutting fabric!
First cut your base, I find it easiest to make the entire base one piece instead of cutting top and bottom separate.
(The photo shows the back of the apron already finished, but notice how the base fabric is one piece.)


Next, cut out those pretty ruffles. Use the width that you had to do all the silly math for and now add 6* more inches (that's all the math, I promise) and 12 inches long.
*Add 6, 8, or 10 inches. It depends on how ruffly you want your apron. The wider you make it, the more ruffly it will be, but be sure to add in multiples of 2.

You can do more than one ruffle if you would like, I will guide you through what you would need to do with more if that is what you choose.


Time to cut out those straps! You will need to cut three straps.
1&2 will be identical. They need to be 4 inches wide and about 35 inches long.
The third also needs to be 4 inches wide, but only about 23 inches long. This is the strap that will be at the top of the apron.

Step 4:
Put away the scissors; get out the machine! It's sewing time.

The next few steps will be old news to experienced sewers (which I am not, but I pretend to be).

Base and ruffles- Sew all edges so that the fabric will not start coming apart. You may want to pin the edges down so that it will stay together, but I find it just as easy to iron them down so that I will not have to worry about the pins.
Fold every side down about 1/2 inch and then again 1/2 inch so that the raw edge is inside a "pocket".


***In the picture, I have folded the fabric over much farther than 1/2 inch; this is so that you will understand how to do the folds.

Straps- Fold every strap in half (Width-wise). Fold them inside out so that the back side of the fabric is on the outside.
Sew one end and the length of the strap. Leave one end unsewn.
This step is always my least favorite, but it must be done. We will prevail! Pull the strap from inside out to right side out.
Don't worry about sewing the open end, you will do this when you put the pieces together.
Step 5:
Before we start assembling everything together, we need to sew a few pleats into the top of the apron so that it fits nice.
I find that two 1-inch pleats sewn down make the apron fit perfect.
Fold about 1 inch of the fabric back and sew a few stitches to hold it. Do this to both sides of the top.

Straps & Ties-  Sew the top strap to the apron making sure not to let it twist anywhere.
Sew on each of the ties. Make sure that you place the unsewn ends on the apron.


Ruffles- Line up your ruffle evenly with the apron (you will need to pin the ruffles down). Turn the top side in so that the stitch will not be seen. Make 1-inch folds across the ruffle so that it ends up the same length as the apron. Always make the fold toward the outside of the apron (halfway through, you will switch directions).
*If you have made more ruffles, do the exact same things but move the next ruffle about 5 inches down the apron.

That's it! I hope that you were able to read this easily and that you understand it! I must note that I definitely do not call myself a sewer, I don't know the technical words for things, or the "right" way to do things. I have taken what I already know, and taught myself a lot about sewing. Sometimes, that is the best way to learn!
If you have any questions at all, feel free to ask! I will try my best to answer them(:


Here is a little extra-
My fabric was from Schoolhouse Fabrics in Floyd, Va.
My camera has a scratch on the lens, so there is a blurry blob in every picture:(
My sparkly nails are OPI(:
My necklace is from Origami Owl. (Ashley sells them, so talk to her about getting one!)

Thanks so much for reading!
-xoxo Emily